Täglich bieten wir KOSTENLOSE lizenzierte Software an, die ihr sonst bezahlen müsstet!
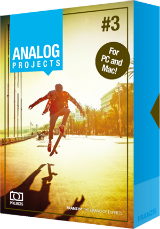
Giveaway of the day — ANALOG projects 3 (Win&Mac)
ANALOG projects 3 (Win&Mac) war am 5. Juli 2019! als Giveaway verfügbar!
Mit Analog projects 3 holt ihr euch die angesagten Styles der Bilder von Instamatic und Co. an Bord. Mit den einzigartigen Tools von Analog projects 3 spielt ihr mit Lichtquellen, Farbtonungen, Korn, Vignetten, Texturen, Unschärfe- und Lens Flare-Effekten und erstellt so professionell gestylte Bilder wie ein Bildbearbeitungsprofi!
Funktionen:
- Professionelle SCA-Bearbeitung für die feinsten Farbdetails;
- Kratzer- und Sensorfehler-Korrektur;
- Neue Einstellungen, die von professionellen Fotografen vorgeschlagen wurden;
- Kann auf mehrere Weisen benutzt werden: Analog projects 3 ist als Adobe Photoshop und Lightroom-Plugin sowie als ein Einzeltool einsetzbar.
Bitte beachtet: Das Archiv beinhaltet unter anderem eine Mac-Version!
System-anforderungen:
Min. System Requirements: Windows 10/8/7, Prozessor Core Duo, 2 GB HDD, 1.280 x 1024 Pixels Screen Resolution, Graphic: DirectX-8-compatible, 128 MB, 32 bit colour depth; Mac OS X ab 10.7, 64 Bit, Prozessor Intel/G5, 2 GB HDD, 1.280 x 1024 Pixels Screen Resolution
Herausgeber:
FRANZIS Verlag GmbHHomepage:
https://www.projects-software.com/analogDateigröße:
427 MB
Preis:
$69.00
GIVEAWAY download basket
Kommentare zum ANALOG projects 3 (Win&Mac)
Please add a comment explaining the reason behind your vote.
It's a bit of fun and this is the latest version, although perhaps more as there hasn't been an update for some time.
Anyway here's my latest comments on it (I have it already)...
As usual a complicated registration process if it's your first time with Franzis. It's a program from 2015 but also the latest version, as they seem to have stopped updating it. It also comes with a Raw file import library from 2014 so straight-out-of-the-box won't support more recent cameras. However you can just copy a later version of FreeImage.dll over the one in the program's directory to help with that (although it's still not completely up-to-date). You can get this from SourceForge or just download:
http://transfer.franzis.de/projects/RawImageDllprojects_Win64.zip
and replace "C:\Program Files\Franzis\ANALOG projects 3" with the dll file it contains. (You may need to rename the original file first.)
If you're not running the 64-bit version of Windows, i.e. your computer doesn't have a directory "C:\Program Files (x86)" then the file you want for upgraded raw support in 32-bit Windows is: http://transfer.franzis.de/projects/RawImageDll_projects_Win32.zip
Note these are still not completely up-to-date, so recent cameras may not have Raw support and you have to use the JPG or make a 16-bit TIF file in your favourite Raw processing software. You may never bother with Raw with this tool anyway as it's not critical.
If you have a Mac you'll need to get the OSX version of FreeImage from SourceForge and replace the existing one, wherever it might be.
Here's my getting-started instructions on using it:
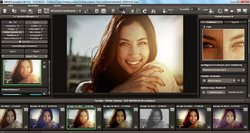
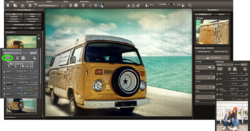
Load a picture, play with the canned effects on the left side, play with the Film Type on the right side panel (which should start on the “Finalise” tab). You can then mess with assorted settings in the middle of the panel and at the bottom of the panel you can select toning options.
Changing to "Expert" in the right panel you can add filters from the list at the top, select them in the middle of the panel and tweak their effects at the bottom (may need scrolling down). (I'd ignore that until you are comfortable using it.)
The boxes at the top of the left panel just filter the effects that are listed in the panel, so ignore them initially. On a faster computer you can use the Eye icon on the toolbar to disable the preview mode and show the final image in the main window, which IMHO is worth doing.
Press and hold the right mouse button on the image to see the "before" image. Double (left button) clicking on the image zooms you all the way in/out (one after the other). A mouse scroll wheel also zooms. When not zoomed fully out the left mouse button can drag the viewing area around the image.
When saving the final image note that the first dialog, where it asks for the title, is going to write that over the image, it isn't the file name.
The main disadvantage is the lack of Undo operations, you can set restore points though (which appear in a timeline).
Note that although they do add a Photoshop plugin it's under File->Export, not Filters, which IMHO doesn’t really count. (You need their v5 products to get "real" Photoshop filters.)
The thing to get your brain around is it a huge pile of image processing tools, which are gathered together into presets in the left pane. All those options do is select a bunch of processing tools (as shown in "expert") and choose options for them, so they are infinitely tweakable in the right pane.
P.S. Note it's not high-DPI (i.e. 4k/5k monitor) friendly. I'd recommend, on WIndows 10, that you right mouse button the program, select Properties, then the Compatibility tab, click "Change high DPI settings", tick "Override high DPI scaling..." at the bottom of the next dialogue and select "System (Enhanced)".
I'd like to add some more info to one paragraph (and editing isn't allowed):
"The boxes at the top of the left panel just filter the effects that are listed in the panel, so ignore them initially. Although one use you might want to play with is, when you run down the presets looking for ones you like, you click the * beside them to mark them as favourites. When you're done click on favourites at the top to just show those (click "All" to return to seeing all the presets). This does mean with the next image you'll have to deselect ones that are already selected, if they aren't making the cut. Of course you could also use it just to slim down to a few general favourites."
Also note the Eye icon is one of the first to disappear if the Window is too narrow to show everything on the Toolbar. If you don't see it make the program's window wider.
Just a few examples from one original:
https://ootjegotd.stackstorage.com/s/xwXu6warbizU3aQ
Hi, when using Presets in this Program - points worth remembering: Each time you open an Image and decide on particular Preset, but further try to alter something or adjust settings in your right Pane to view if you like it, or need to carry on till you reach desired result - there is NO 'Undo' Button, or Arrow on TOP in it's Tool Bar Options, or alternatively bottom corner of that Console!! Instead - you have tiny (I mean tiny!) 'reset' icons/buttons in a shape of circular arrows - both inside Presets themselves in your left Panel, or next to adjustments bars on your right. 'Reset' will take you to default state of any settings and your Image to square one within Presets.. So you either remember to use them immediately after each change (thus undoing your LAST action), or end up undoing the lot at once later! Yes, you can create 'Restore Points' from top Task-bar choices which will give 1 undo.., but tell you these Restore Points take a lot of Memory to keep and work with..
Here, I have to mention also 'save as' format choices!.. My preferred one (File/Save final image/Save) from past experience was TIFF 16-Bit for smaller 'portrait' photos, it'll make them bigger in dimensions but much larger in size (eg, original image of 374x498, size 25KB will ended up as 500x666, size 2.5 MB), so it's worth remembering!
Other saving formats - again matter of practice what works, what doesn't with given options.. Another advice to add would be to remember to save final Images to Desktop (in case they came from some Photo Folder) to avoid accidental loss of original.
Finally - can anyone understand why make the whole process of creating lovely photo Images and saving them - so annoyingly complicated and fiddly, turning simple joy to some hard slog?? If you're a first time user - that's basically what you'll get with any FRANZIS Program, as interesting as they all are, I'm sure. Time FRANZIS introduced that Undo Button/Arrow to it's obvious place (TOP Guys, please!) and added few regular formats to saving Options?? Simplicity before 'Uniqueness' can truly work like a charm!
fran,
"... can anyone understand why make the whole process of creating lovely photo Images and saving them - so annoyingly complicated and fiddly..."
That's Franzis. Seriously. Every pro review I've read of their software, e.g. their Denoise app [which I bought], mentions other software that's easier to use -- that was always their complaint with Franzis.
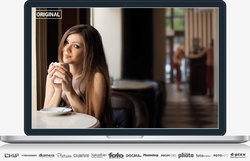

Das Bild über RAW einlesen, dann kann auch das Original bearbeitet werden.
Save | Cancel
Das Programm verfügt durchaus über vielfältige Werkzeuge, um ein Bild zu bearbeiten, zu verbessern und mit Effekten zu versehen. Aber leider habe ich keine Möglichkeit gefunden, das Original direkt nach eigenen Vorstellungen zu bearbeiten. Als Ausgangsbasis muss immer eine der 102 Voreinstellungen gewählt werden. Das gefällt mir absolut nicht. Meiner Meinung nach verschenkt das Programm sein mögliches Potential. Letztlich erhält man nur Ergebnisse mit einem breiten Spektrum fotografischer Fehler, welche man dann noch einem aufwendigen Feintuning unterziehen kann. - Schade!
Save | Cancel